วันพุธที่ 26 พฤศจิกายน พ.ศ. 2557

แสดงวันที่ปัจจุบันด้วย TextView

              สวัสดีครับทุกท่านเป็นอย่างไรกันบ้างไม่ได้เจอกันเสียนาน วันนี้ผมมาสอนทำการแสดงวันที่ปัจจุบันด้วย Text View กันครับ
           
              เริ่มแรกเลยเราก็มาสร้าง Project กันก่อน เลือก Version กันตามชอบได้เลยนะครับ ส่วนผมของเลือกMin เป็น 4.0 แล้วกัน


              เรามาดูหน้าตา Layout ของ Application กันนะครับ หน้าตาก็ไม่มีอะไรมากแค่เป็น TextView 3 อัน


activity_main.xml

1:  <RelativeLayout xmlns:android="http://schemas.android.com/apk/res/android"  
2:    xmlns:tools="http://schemas.android.com/tools"  
3:    android:layout_width="match_parent"  
4:    android:layout_height="match_parent"  
5:    tools:context="app.kamonwat.showdatewithtext.MainActivity" >  
6:                   <TextView  
7:                     android:layout_marginTop="30dp"  
8:                  android:id="@+id/show_date_dayofweek"  
9:                  android:layout_gravity="center"  
10:                  android:layout_width="wrap_content"  
11:                  android:layout_height="wrap_content"  
12:                  android:layout_centerHorizontal="true"  
13:                  android:textSize="16sp"  
14:                  android:text="Monday" />  
15:                <TextView  
16:                  android:id="@+id/show_date_day"  
17:                  android:layout_below="@+id/show_date_dayofweek"  
18:                  android:layout_gravity="center"  
19:                  android:layout_width="wrap_content"  
20:                  android:layout_height="wrap_content"  
21:                  android:layout_centerHorizontal="true"  
22:                  android:textSize="36sp"  
23:                  android:text="24" />  
24:                <TextView  
25:                  android:id="@+id/show_date_monthyear"  
26:                  android:layout_below="@+id/show_date_day"  
27:                  android:layout_gravity="center"  
28:                  android:layout_width="wrap_content"  
29:                  android:layout_height="wrap_content"  
30:                  android:layout_centerHorizontal="true"  
31:                  android:textSize="16sp"  
32:                  android:text="September 2014" />  
33:  </RelativeLayout>  

              Textview show_date_dayofweek จะใช้แสดงชื่อของวันเช่น วันจันทร์ วันอังคาร
              Textview show_date_day ใช้แสดงเลขวันที่
              Textview show_date_monthyear ใช้แสดงชื่อของเดือนและปี

              ต่อมาเรามาดูส่วนของ Code กันบ้าง

MainActivity.java

1:  package app.kamonwat.showdatewithtext;  
2:  import java.text.SimpleDateFormat;  
3:  import java.util.Calendar;  
4:  import android.annotation.SuppressLint;  
5:  import android.app.Activity;  
6:  import android.os.Bundle;  
7:  import android.widget.TextView;  
8:  public class MainActivity extends Activity {  
9:       private TextView txt_dayofweek, txt_day, txt_month_year;  
10:       final String[] MONTH = { "January", "February", "March", "April", "May",  
11:                 "June", "July", "August", "September", "October", "November",  
12:                 "December" };  
13:       private int pYear;  
14:       private int pMonth;  
15:       private int pDay;  
16:    @SuppressLint("SimpleDateFormat") @Override  
17:    protected void onCreate(Bundle savedInstanceState) {  
18:      super.onCreate(savedInstanceState);  
19:      setContentView(R.layout.activity_main);  
20:            txt_day = (TextView) findViewById(R.id.show_date_day);  
21:            txt_dayofweek = (TextView) findViewById(R.id.show_date_dayofweek);  
22:            txt_month_year = (TextView) findViewById(R.id.show_date_monthyear);  
23:            /** Get the current date */  
24:            Calendar cal = Calendar.getInstance();  
25:            pYear = cal.get(Calendar.YEAR);  
26:            pMonth = cal.get(Calendar.MONTH);  
27:            pDay = cal.get(Calendar.DAY_OF_MONTH);  
28:            String day = new SimpleDateFormat("EEEE").format(cal.getTime());  
29:            txt_day.setText("" + pDay);          //show day  
30:            txt_dayofweek.setText(day);          //show name of day  
31:            txt_month_year.setText(MONTH[pMonth] + " " + pYear);     //show month and year  
32:    }  
33:  }  

              สังเกตบรรทัดที่ 24 เราจะประกาศตัวแปร Calendar cal = Calendar.getInstance(); เพื่อเรียกใช้ปฏิทิน และจะเรียกวันที่เป็นวันปัจจุบัน
               บรรทัดที่ 25 จะใช้ตัวแปร pYear เก็บค่าของปี โดยใช้คำสั่ง cal.get(Calendar.YEAR); ค่าที่ได้จะเป็น 2014
               บรรทัดที่ 26 จะใช้ตัวแปร pMonth เก็บค่าของเดือน โดยใช้คำสั่ง cal.get(Calendar.MONTH); ค่าที่ได้จะเป็น 0 - 11
               บรรทัดที่ 27 จะใช้ตัวแปร pDay เก็บค่าของเดือน โดยใช้คำสั่ง cal.get(Calendar.DAY_OF_MONTH); ค่าที่ได้จะเป็น 1 - 31 แล้วแต่เดือน
               บรรทัดที่ 28 เราจะใช้ String เก็บชื่อของวันนั้นๆว่าเป็นวันอะไร โดยจะใช้คำสั่ง new SimpleDateFormat("EEEE").format(cal.getTime()); ค่าของ String จะได้ออกมาเป็น Monday, Thursday, ... แล้วแต่ว่าวันนั้นจะเป็นวันอะไร

               หลังจากได้ค่าที่จำเป็นทั้งหมดแล้วก็ทำการกำหนดให้ Textview แสดงค่าที่เราเก็บเอาไว้ สำหรับการแสดงชื่อเดือน ก็ใช้ Array String เก็บชื่อเดือนทั้ง 12 เดือนเอาไว้ก่อนแล้วค่อนใช้ pMonth เป็น Index ในการเรียกออกมาจาก Array

               ง่ายๆใช่มั้ยครับ แค่ดึงค่าจาก Calendar แล้วนำมาแสดงใน Textview เท่านั้นเอง

AndroidManifest.xml

1:  <?xml version="1.0" encoding="utf-8"?>  
2:  <manifest xmlns:android="http://schemas.android.com/apk/res/android"  
3:    package="app.kamonwat.showdatewithtext"  
4:    android:versionCode="1"  
5:    android:versionName="1.0" >  
6:    <uses-sdk  
7:      android:minSdkVersion="14"  
8:      android:targetSdkVersion="21" />  
9:    <application  
10:      android:allowBackup="true"  
11:      android:icon="@drawable/ic_launcher"  
12:      android:label="@string/app_name"  
13:      android:theme="@style/AppTheme" >  
14:      <activity  
15:        android:name=".MainActivity"  
16:        android:label="@string/app_name" >  
17:        <intent-filter>  
18:          <action android:name="android.intent.action.MAIN" />  
19:          <category android:name="android.intent.category.LAUNCHER" />  
20:        </intent-filter>  
21:      </activity>  
22:    </application>  
23:  </manifest>  

Source Code
https://drive.google.com/file/d/0B3lD-OnLc3-mam96c3NJOEFYZXM/view?usp=sharing

วันจันทร์ที่ 29 กันยายน พ.ศ. 2557

The SMS Sender


This is my first application on Google Play Store. It is one functional and easy ui. The sms sender will help you to send many sms in one time.


Just enter phonenumber of reciever, number of time to send and message.then click send button. I hope you will like it.

You can download in Google Play

วันพฤหัสบดีที่ 19 มิถุนายน พ.ศ. 2557

[Android]จำกัดตัวอักษรของ Edittext

วันนี้ขอนำเสนอๆ วิธีง่ายๆที่เราจะจำกัดจำนวนตัวอักษรของ Edittext ด้วย XML กัน


           <EditText
                android:id="@+id/detail_edittxt"
                android:textColor="#424c55"
                android:maxLength="100"
                android:layout_width="match_parent"
                android:layout_height="wrap_content" >

สังเกตที่ maxlength จะเห็นว่า maxlength จะเป็น 100 แสดงว่า Edittext นี้จะจำกัดตัวอักษรที่รับได้แค่ 100 ตัวเท่านั้น

ง่ายๆเพียงเท่านี้แหละครับ เราก็จะสามารถจำกัดตัวอักษรของ Edittext ได้แล้ว

วันอังคารที่ 18 มีนาคม พ.ศ. 2557

[ASP.NET C#] Export exel file

สวัสดีครับทุกท่าน สำหรับใครที่ใช้ C# ASP.Net เขียนเว็บก็อาจจะมีงานที่ต้องไปเชื่อมต่อกับ Database ซึ่งบางครั้งเราก็ต้องการ export ข้อมูลนั้นๆ ออกมาเป็นไฟล์ ซึ่งวันนี้เราจะมาลอง export file exel กันนะครับ

ก่อนอื่นเราจะ export ออกมาเป็น exel โดยเราจะเอา string ไป export ซึ่ง string นั้นต้องสร้างมาจาก table html ก่อน

 string content = "<html><body><table><tr><td>Head1</td><td>Head2</td></tr><tr><td>data1</td><td>data2</td></tr></table></body></html>";  

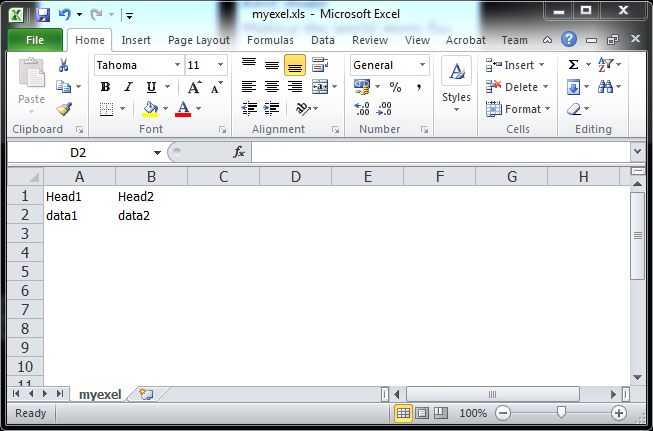
จะสังเกตว่าจะมี table โดยประกอบด้วย 2 row 2 colum จะได้แบบนี้ครับ

                                                                       Head1              Head2
                                                                       data1                data2

ต่อมาเราจะทำส่วนของการสร้างไฟล์เพื่อให้ดาวน์โหลดกันนะครับ
1:  Response.Clear();  
2:  Response.AddHeader("Content-Disposition", "attachment;filename=myexel.xls");  
3:  Response.ContentType = "application/vnd.xls";  
4:  Response.Cache.SetCacheability(HttpCacheability.NoCache); // not necessarily required  
5:  Response.Charset = "";  
6:  Response.Output.Write(content);  
7:  Response.End();  

บรรทัดที่ 2 ตรง filename คือที่ระบุชื่อไฟล์ output ของเราครับ ผมตั้งไว้ว่า myexel
บรรทัดที่ 6 ให้เรานำตัวแปร string content ของเราใส่ไว้ใน Write(content)

เสร็จแล้วครับ ง่ายมั้ยครับ เพียงแค่เราเอา Code ด้านบนไปวางไว้ใน Button เวลาเรากดปุ่มจะดาวน์โหลด Browser จะโหลดไฟล์ exel ลงเครื่อง


นี่คือไฟล์ exel ที่เราได้ออกมาครับ


วันจันทร์ที่ 17 มีนาคม พ.ศ. 2557

[Android] Share ข้อความ String ด้วย Action Send

สวัสดีครับทุกท่าน นอกจากการใช้ API ของตัว Social นั้นๆ แล้ว ยังมีอีกวิธีนึงที่เราจะแชร์รูปหรือแชร์ข้อความออกไปได้โดยผ่าน Activity นั้นก็คือ Action Send

จุดประสงค์ของครั้งนี้
1. สร้างปุ่ม Share ขึ้นมา เมื่อกดปุ่มแชร์ส่งข้อความหรือรูปออกไป
2. แชร์ข้อความ String ตัวข้อความผมขอกำหนดเองเลยนะครับ เราสามารถใช้ช่อง Text input ได้เหมือนกัน แต่เพื่อความสะดวกครับ
3. แชร์รูป โดยผมจะแชร์ Image รูปสุดท้ายใน Album (เพื่อความสะดวกของผม)

เริ่มแรกเราต้องสร้าง XML ไฟล์สำหรับใส่ปุ่มของเราก่อนนะครับ อันนี้ผมใช้ activity_main.xml ที่ได้จากการ New Project เลย

activity_main.xml
1:  <RelativeLayout xmlns:android="http://schemas.android.com/apk/res/android"  
2:    xmlns:tools="http://schemas.android.com/tools"  
3:    android:layout_width="match_parent"  
4:    android:layout_height="match_parent"  
5:    tools:context=".MainActivity" >  
6:    <Button  
7:      android:id="@+id/main_share"  
8:      android:layout_width="wrap_content"  
9:      android:layout_height="wrap_content"  
10:      android:layout_centerVertical="true"  
11:      android:layout_centerHorizontal="true"  
12:      android:layout_below="@+id/main_take"  
13:      android:onClick="onShare"   
14:      android:text="Share" />  
15:  </RelativeLayout>  
สังเกตว่าผมใส่ android:onClick="onShare" เอาไว้ เราจะเอาไว้ใส่ function เมื่อกดปุ่มกัน
เราจะได้ layout ออกมาแบบนี้นะครับ
ต่อมาเราจะมาส่งข้อความ String กันนะครับ โดยเราจะทำกันในส่วนของ Java Code ซึ่งผมจะใช้เป็น MainActivity.java ที่ได้มาตั้งแต่ตอนสร้าง Project นะครับ

เราจะส่งแชร์ข้อความโดยเริ่มสร้าง Intent ของ Action_send ก่อนครับ

 final Intent share = new Intent(Intent.ACTION_SEND);  
จากนั้นเราก็กำหนด ชนิดของ object ที่เราจะส่งออก ซึ่ง "text/plain" คือเราจะส่งออกเป็น text

 share.setType("text/plain");  

สุดท้ายเราจะใส่ String ของเรา
 share.putExtra(Intent.EXTRA_TEXT, "This is my text to send.");  

"This is my text to send." คือ String ที่ผมจะส่งออกไปครับ เราสามารถเปลี่ยนเป็นชื่อของตัวแปรแทนได้
เราจะได้ไฟล์ MainActivity.java ดังนี้

MainActivity.java
1:  public class MainActivity extends Activity {  
2:   @Override  
3:   protected void onCreate(Bundle savedInstanceState) {  
4:    super.onCreate(savedInstanceState);  
5:    setContentView(R.layout.activity_main);  
6:   }  
7:      public void onShare(View v)  
8:   {  
9:          final Intent share = new Intent(Intent.ACTION_SEND);  
10:          share.setType("text/plain");  
11:    share.putExtra(Intent.EXTRA_TEXT, "This is my text to send.");  
12:          final String chooserTitle = "Share Snaphot";  
13:     MainActivity.this.startActivity(Intent.createChooser(share, chooserTitle));  
14:     } catch (final Exception e) {  
15:      Log.d("MyShare","Error");  
16:     }  
17:   }  
18:  }  

บรรทัดที่ 7 คือชื่อฟังก์ชั่นที่เราใส่ไว้ใน xml
บรรทัดที่ 9 คือ Intent Action Send ที่เราสร้างขึ้นมา
บรรทัดที่ 13 คือสร้างตัวเลือกเป็น Popup ขึ้นมา

เมื่อเรากดปุ่ม Share จะได้รูปแบบด้านล่าง
ซึ่งตัวเลือกของมือถือแต่ละเครื่องจะแตกต่างกัน List ที่ขึ้นมาจะเป็น Application ที่ติดตั้งอยู่ในมือถือของเรา

เสร็จแล้วครับการส่ง String ด้วย Intent Action Send ครั้งหน้าเราจะแชร์รูปกันนะครับ